context.fillStyle will set the color for all future fills such as
context.fillRect(). It's important to note theat context.fillStyle
is not a method, it is an attribute. You set it like so:
context.lineTo(x, y) creates a path from the current point - default (0,0) -
to the point (x, y). In order to see the line you must call context.stroke().
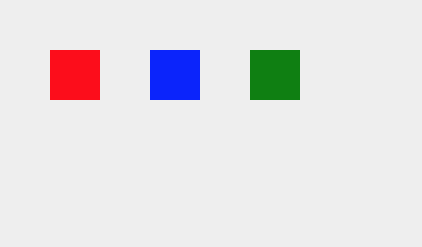
context.save() saves all of the properties of the context. Then, when you call
context.restore() it will reset all changes to the context you've made.
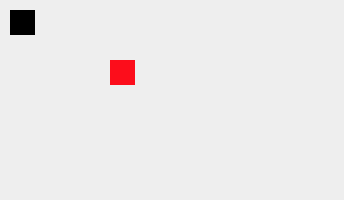
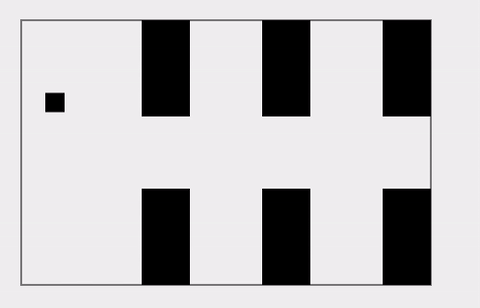
This code will produce the image below (note how the second rectangle is black
and closer to the original origin despite calling translate and setting the
fillStyle earlier):
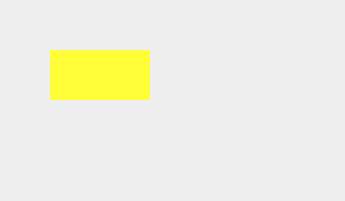
context.scale(percentX, percentY) scales the x and y coordinates of the context, making drawings
larger or smaller.
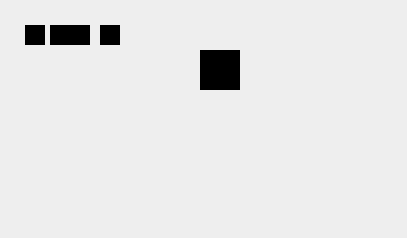
This code will produce the image below (note that all rectangles are defined to be the same size
in the code are drawn in different sizes due to the scale of the context):
context.translate(x, y) shifts the origin of the context (where the (0,0) point is)
right by x and down by y. This allows you to draw execute multiple commands in a specific
area of the context more easily.
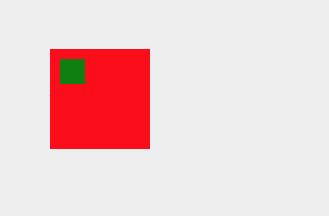
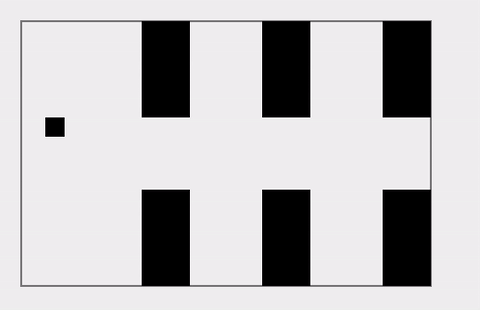
This code will produce the image below (note how the fillRect commands are
relative to the translation point (100,100)):
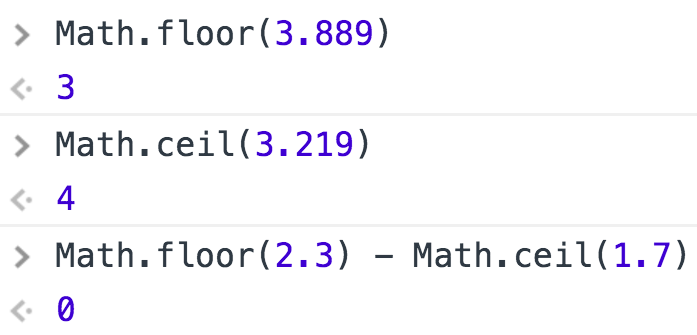
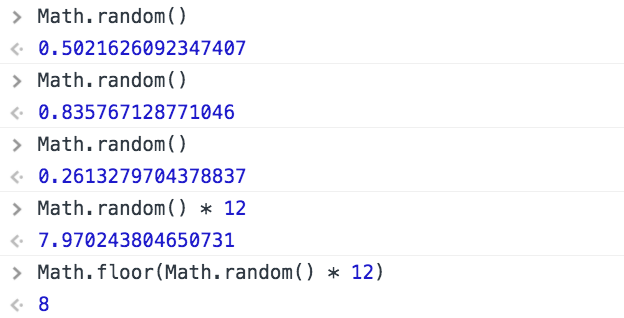
Math.round(), Math.floor() and Math.ceil() will round a number to an integer.
Math.floor() will always round down while Math.ceil() will always round up.
Math.round() will round to the closest integer, either up or down.
Math.random() will produce a random decimal betweek 0 and 1. Calling it many
times will produce a different random number each time.
Often you will multiple Math.random() by another number to get a random
integer larger than 1. You may also call Math.floor() or Math.ceil() on the result
to get an rounded integer.
We'll walk through a series of challenges that
move our flappy square toward an animation that
simulates gravity, causing it to fall off of our
canvas.
Lesson: Using Functions
Right now we only have one wall. In our game we're going to
need an endless stream of walls for our flappy square to fly through.
Calling
context.fillRect()
over and over and over again in our code is not going to work.
If there is a chunk of code that you are going to use over and over again,
putting that code into a function can make your life much easier. Then,
to run the code, all you have to do is call the function by typing one line.
In this example, we create a function that will draw a French flag. Because
we might want to draw a French flag in lots of different places, we make the
x- and y-coordinates of the flag variables.
When we call drawFrenchFlag(30, 100), the 30 is assigned to the variable x
and the 100 is assigned to the variable y inside of the function. Now we can
easily draw as many French flags as we want!
Functions are a core concept in software development. If you feel uncertain about them
you should click on the "Functions" quick reference button below and click on the
"Full Lesson" button in the pop-up.
var canvas = document.getElementById('flappy_square_stage2_lesson1');
var context = canvas.getContext('2d');
function drawFrenchFlag(x, y) {
context.fillStyle = '#0055A4';
context.fillRect(x, y, 20, 40);
context.fillStyle = '#FFFFFF';
context.fillRect(x + 20, y, 20, 40);
context.fillStyle = '#EF4135';
context.fillRect(x + 40, y, 20, 40);
}
drawFrenchFlag(30, 100);
drawFrenchFlag(150, 50);
drawFrenchFlag(300, 180);
Message Log
This is a lesson, not a challenge, the code runs automatically.
But change it! Play with it! Click "Run" to see your changes.
Run
Run and Focus Canvas
Reset
Canvas
(your drawing will display here)
Challenge 1
Challenge 1 Sample Solution
Let's write three functions that draw our boundary, our flappy square, and our wall.
Our boundary will be drawn in the
drawBoundary()
function which will not need any parameters. All of the information we need
for this function comes from our boundary hash variable.
Our flappy square function will be called
drawSquare()
and will not require any parameters either. We'll use our square hash variable within
our function to draw the square like so:
function drawSquare() {
  context.fillRect(square.x, square.y, square.size, square.size);
}
Lastly our walls will be drawn in the
drawWall(x)
function which will accept one parameter, the "x" coordinate of the wall.
Once your functions are in place we can call the
drawWall(x)
function three times from a
drawWalls()
function, creating walls
every 125 pixels,
starting from the left border of the boundary.
So if you wrote code like this:
drawWall(100);
drawWall(200);
Then the value of 100 and then 200 would be stored in the "x" variable
in the drawWall(x) function. The drawWall(x) function would then use
that x variable to draw one wall at 100 pixels and another wall at
200 pixels.
Once complete your game should look like the example provided above.
Note: Functions are a core concept in software development. If you feel uncertain about them
you should click on the "Functions" quick reference button below and click on the
"Full Lesson" button in the pop-up.
Previous Challenge:
View your
code from
Stage
1
Challenge
6
to use on this challenge.
Code Missing:
You have not yet entered any code in to the previous challenge:
Stage
1
Challenge
6
Stage
1
Challenge
6
Editor
(write code below)
var canvas = document.getElementById('flappy_square_stage2_challenge1');
var context = canvas.getContext('2d');
// BOUNDARY HASH HERE
// SQUARE HASH HERE
// WALL HASH HERE
// GAME BOUNDARY FUNCTION
function drawSquare() {
context.fillRect(square.x, square.y, square.size, square.size);
}
function drawWall(x) {
// Write your code to draw a wall here
// but use the "x" variable that is passed
// in to draw a wall in different places.
}
function drawWalls() {
// CODE TO CALL WALL FUNCTION THREE TIMES HERE
}
drawBoundary();
drawSquare();
drawWalls();
Message Log
This is a lesson, not a challenge, the code runs automatically.
But change it! Play with it! Click "Run" to see your changes.
Run
Run and Focus Canvas
Reset
Canvas
(your drawing will display here)
A Solution:
Here's the code I wrote to complete this challenge.
View One Possible Solution
In each of these examples we have to do math to shift the everything we
are drawing to take into account the boundary.
The canvas's context has a powerful method,
context.translate(x, y)
that allows you to shift the origin of the canvas.
This means that the point (0, 0) is no longer the top left corner of the canvas.
For example, if you were to call
context.translate(50, 200);
then from then on if you were to call
context.translate(50, 50, 10, 10);
it would draw a square at the point (100, 250) instead of (50, 50);
This means we can shift our origin point to be at the top left
corner of our boundary instead of the top left corner of the canvas.
This will greatly simplify our code.
In this example we take the flags drawn in the previous example and use
context.translate(x, y)
to shift the origin to the top left corner
of the flag. From there we can more easily draw the flag without having
to do any math to position the rectangles.
var canvas = document.getElementById('flappy_square_stage2_lesson2');
var context = canvas.getContext('2d');
function drawFrenchFlag(x, y) {
context.save(); // Save the drawing state before making any changes
context.translate(x, y); // Move the origin of the coordinate system to the top left corner of the flag
context.fillStyle = '#0055A4';
context.fillRect(0, 0, 20, 40); // The blue rectangle is drawn at (0, 0)
context.fillStyle = '#FFFFFF';
context.fillRect(20, 0, 20, 40); // The white rectangle is drawn at (20, 0)
context.fillStyle = '#EF4135';
context.fillRect(40, 0, 20, 40); // The red rectangle is drawn at (40, 0)
context.restore(); // Restore the drawing state to the way it was when we saved it
}
drawFrenchFlag(30, 100);
drawFrenchFlag(150, 50);
drawFrenchFlag(300, 180);
Message Log
This is a lesson, not a challenge, the code runs automatically.
But change it! Play with it! Click "Run" to see your changes.
Translate the origin from the top left corner of the canvas (0, 0) to the
top left corner of the boundary (boundary.minX, boundary.minY).
From that point on the origin (0, 0) will now be the top left corner of the boundary.
This means you'll need to change the rest of your code to take into account
the new origin. This should make the code much simpler.
In particular you'll need to
adjust the "x" and "y" values
in your square hash variable:
square.x
In the end your flappy square game should look just like it did after the last
challenge but the code should be simplified.
Previous Challenge:
View your
code from
Stage
2
Challenge
1
to use on this challenge.
Code Missing:
You have not yet entered any code in to the previous challenge:
Stage
2
Challenge
1
Stage
2
Challenge
1
Editor
(write code below)
var canvas = document.getElementById('flappy_square_stage2_challenge2');
var context = canvas.getContext('2d');
// BOUNDARY HASH HERE
// SQUARE HASH HERE
// Don't forget to change the x and y values.
// WALL HASH HERE
// GAME BOUNDARY FUNCTION
// DRAW SQUARE FUNCTION
// DRAW WALL FUNCTION
// DRAW WALLS FUNCTION
// CODE TO TRANSLATE THE ORIGIN
drawBoundary();
drawSquare();
drawWalls();
Message Log
This is a lesson, not a challenge, the code runs automatically.
But change it! Play with it! Click "Run" to see your changes.
Run
Run and Focus Canvas
Reset
Canvas
(your drawing will display here)
A Solution:
Here's the code I wrote to complete this challenge.
View One Possible Solution
var canvas = document.getElementById('flappy_square_stage2_challenge2');
var context = canvas.getContext('2d');
var boundary = {
minX: 25,
minY: 25,
width: 425,
height: 275
};
var square = {
x: 25,
y: 75,
size: 20
};
var wall = {
width: 50,
height: 100
};
function drawBoundary() {
context.strokeRect(0, 0, boundary.width, boundary.height);
}
function drawSquare() {
context.fillRect(square.x, square.y, square.size, square.size);
}
function drawWall(x) {
context.fillRect(x, 0, wall.width, wall.height);
context.fillRect(x, boundary.height - wall.height, wall.width, wall.height);
}
function drawWalls() {
drawWall(125);
drawWall(125 * 2);
drawWall(125 * 3);
}
context.translate(boundary.minX, boundary.minY);
drawSquare();
drawBoundary();
drawWalls();
Challenge 3
Challenge 3 Sample Solution
You may have noticed that the lesson on
context.translate(x, y)
calls the method
context.save()
and the method
context.restore()
function drawFrenchFlag(x, y) {
  context.save(); // Save the drawing state before making any changes
  context.translate(x, y); // Move the origin of the coordinate system to the top left corner of the flag

  ...

  context.restore(); // Restore the drawing state to the way it was when we saved it
}
We need to call
context.save()
and
contest.restore()
in order to reset the canvas origin.
If we call
context.translate()
more than once then each translation will build on top of the last. So this:
Previous Challenge:
View your
code from
Stage
2
Challenge
2
to use on this challenge.
Code Missing:
You have not yet entered any code in to the previous challenge:
Stage
2
Challenge
2
Stage
2
Challenge
2
Editor
(write code below)
var canvas = document.getElementById('flappy_square_stage2_challenge3');
var context = canvas.getContext('2d');
// CODE FROM PREVIOUS CHALLENGE
// Place context.save() before the translation
// and context.restore() after everything has been drawn.
Message Log
This is a lesson, not a challenge, the code runs automatically.
But change it! Play with it! Click "Run" to see your changes.
Run
Run and Focus Canvas
Reset
Canvas
(your drawing will display here)
A Solution:
Here's the code I wrote to complete this challenge.
View One Possible Solution
var canvas = document.getElementById('flappy_square_stage2_challenge3');
var context = canvas.getContext('2d');
var boundary = {
minX: 25,
minY: 25,
width: 425,
height: 275
};
var square = {
x: 25,
y: 75,
size: 20
};
var wall = {
width: 50,
height: 100
};
function drawBoundary() {
context.strokeRect(0, 0, boundary.width, boundary.height);
}
function drawSquare() {
context.fillRect(square.x, square.y, square.size, square.size);
}
function drawWall(x) {
context.fillRect(x, 0, wall.width, wall.height);
context.fillRect(x, boundary.height - wall.height, wall.width, wall.height);
}
function drawWalls() {
drawWall(125);
drawWall(125 * 2);
drawWall(125 * 3);
}
context.save();
context.translate(boundary.minX, boundary.minY);
drawSquare();
drawBoundary();
drawWalls();
context.restore();
Lesson: Basics of Animation
There are
three required aspects to basic animation
in canvas we need to cover:
Drawing frames in rapid sequence.
Clearing the canvas in between frames.
Making small changes to the scene in each frame.
In this lesson we're going to focus on the 1st and 3rd step of basic animation.
We're going to draw a series of frames, each a bit different from each other,
creating the illusion of continuous motion.
Drawing frames in rapid sequence can be done a number of ways.
For our purposes we'll use the
setInterval(function, intervalTime)
method.
setInterval(function, intervalTime)
runs the specified code at a regular interval (e.g. every second). You can use setInterval in
two different ways. First you can pass it code directly:
setInterval(function() {
  ... some code ...
}, 500)
Or you can pass it a reference to an existing function:
function myFunction() {
  ... some code ...
}

setInterval(myFunction, 500);
A slower running animation
setInterval(programSteps, 1000)
A faster running animation
setInterval(programSteps, 10)
In this case the function will be called as if you ran
myFunction()
every 500 milliseconds.
We're going to use
setInterval() to draw frames in rapid sequence.
We'll pass it a reference to the function
programSteps
which contains the instructions for each frame of our game.
will run slowly, drawing a new frame every second, while
setInterval(programSteps, 10)
will run very quickly, drawing 100 frames every second. The faster an animation runs
the smoother it looks as you can draw frames that change very little, giving the
illusion of continuous motion.
Try playing around with different interval speeds to see how it affects the fluidity
of the animation.
var canvas = document.getElementById('flappy_square_stage2_lesson3');
var context = canvas.getContext('2d');
var interval;
var size = 1;
function drawSquare() {
context.fillRect(0, 100, size, size);
}
function adjustSize() {
size += 10;
}
function programSteps() {
adjustSize();
drawSquare();
}
function runProgram() {
interval = setInterval(programSteps, 500);
}
// The following code is provided for you.
// It creates an eventListener that listens
// for the canvas to come into "focus", which
// happens when you click on it.
// This allows us to stop and start each individual
// animation on this whole page separately.
function startAnimation() {
runProgram();
}
function pauseAnimation() {
clearInterval(interval);
context.font = "20px serif";
context.textAlign = 'center';
context.fillText('Click anywhere on the canvas to start animation', canvas.width / 2, 50);
context.fillText('or click "Run" to restart the animations.', canvas.width / 2, 75);
}
canvas.addEventListener('focus', startAnimation);
canvas.addEventListener('blur', pauseAnimation);
pauseAnimation();
Message Log
This is a lesson, not a challenge, the code runs automatically.
But change it! Play with it! Click "Run" to see your changes.
We'll make the flappy square move down on the canvas. Soon we'll make
it's downward movement look more realistic by mathematically simulating
gravity, but for now we'll just make it move down one step at a time.
Use
setInterval(function, intervalTime),
as provided to
draw the flappy square a bit lower in each frame
as if it were falling.
Have your flappy square
start at (50, 100) and move down 25 pixels every 300 milliseconds.
As we are not yet clearing the canvas in between frames we'll be creating multiple
flappy squares. In the next challenge we'll look at cleaning that up to create
a true animation.
Your animation should look like the example to the right.
Previous Challenge:
View your
code from
Stage
2
Challenge
3
to use on this challenge.
Code Missing:
You have not yet entered any code in to the previous challenge:
Stage
2
Challenge
3
Stage
2
Challenge
3
Editor
(write code below)
var canvas = document.getElementById('flappy_square_stage2_challenge4');
var context = canvas.getContext('2d');
var interval;
// CODE FROM PREVIOUS CHALLENGE HERE
function adjustPosition() {
// ADJUST THE "y" COORDINATE OF THE SQUARE
}
function programSteps() {
adjustPosition();
context.save();
context.translate(boundary.minX, boundary.minY);
drawBoundary();
drawSquare();
drawWalls();
context.restore();
}
function runProgram() {
// FILL IN THE CORRECT setInterval PARAMETERS HERE
interval = setInterval();
}
// The following code is provided for you.
// It creates an eventListener that listens
// for the canvas to come into "focus", which
// happens when you click on it.
// This allows us to stop and start each individual
// animation on this whole page separately.
function startAnimation() {
runProgram();
}
function pauseAnimation() {
clearInterval(interval);
}
canvas.addEventListener('focus', startAnimation);
canvas.addEventListener('blur', pauseAnimation);
canvas.focus();
Message Log
This is a lesson, not a challenge, the code runs automatically.
But change it! Play with it! Click "Run" to see your changes.
Run
Run and Focus Canvas
Reset
Canvas
(your drawing will display here)
A Solution:
Here's the code I wrote to complete this challenge.
View One Possible Solution
var canvas = document.getElementById('flappy_square_stage2_challenge4');
var context = canvas.getContext('2d');
var interval;
var boundary = {
minX: 25,
minY: 25,
width: 425,
height: 275
};
var square = {
x: 25,
y: 75,
size: 20
};
var wall = {
width: 50,
height: 100
};
function drawBoundary() {
context.strokeRect(0, 0, boundary.width, boundary.height);
}
function drawSquare() {
context.fillRect(square.x, square.y, square.size, square.size);
}
function drawWall(x) {
context.fillRect(x, 0, wall.width, wall.height);
context.fillRect(x, boundary.height - wall.height, wall.width, wall.height);
}
function drawWalls() {
drawWall(125);
drawWall(125 * 2);
drawWall(125 * 3);
}
function adjustPosition() {
square.y += 25;
}
function programSteps() {
adjustPosition();
context.save();
context.translate(boundary.minX, boundary.minY);
drawBoundary();
drawSquare();
drawWalls();
context.restore();
}
function runProgram() {
interval = setInterval(programSteps, 300);
}
// The following code is provided for you.
// It creates an eventListener that listens
// for the canvas to come into "focus", which
// happens when you click on it.
// This allows us to stop and start each individual
// animation on this whole page separately.
function startAnimation() {
runProgram();
}
function pauseAnimation() {
clearInterval(interval);
}
canvas.addEventListener('focus', startAnimation);
canvas.addEventListener('blur', pauseAnimation);
canvas.focus();
Lesson: A Complete Animation Cycle
As mentioned in the previous lesson, there are
three required aspects to basic animation:
Drawing frames in rapid sequence.
Clearing the canvas in between frames.
Making small changes to the scene in each frame.
In this lesson we're going to complete the cycle by clearing the canvas
in between frames.
In this example we show the example from the last lesson in reverse. If this were run without
clearing the canvas you wouldn't see any changes, but since we're clearing the canvas
in between each frame we see the drawing get smaller and smaller.
In order to clear the entire canvas we use the following code:
var canvas = document.getElementById('flappy_square_stage2_lesson4');
var context = canvas.getContext('2d');
var interval;
var size = canvas.width;
function drawSquare() {
context.fillRect(0, 0, size, size);
}
function adjustSize() {
size -= 10;
}
function programSteps() {
context.clearRect(0, 0, canvas.width, canvas.height);
adjustSize();
drawSquare();
}
function runProgram() {
interval = setInterval(programSteps, 500);
}
// The following code is provided for you.
// It creates an eventListener that listens
// for the canvas to come into "focus", which
// happens when you click on it.
// This allows us to stop and start each individual
// animation on this whole page separately.
function startAnimation() {
runProgram();
}
function pauseAnimation() {
clearInterval(interval);
context.font = "20px serif";
context.textAlign = 'center';
context.fillText('Click anywhere on the canvas to start animation', canvas.width / 2, 50);
context.fillText('or click "Run" to restart the animations.', canvas.width / 2, 75);
}
canvas.addEventListener('focus', startAnimation);
canvas.addEventListener('blur', pauseAnimation);
pauseAnimation();
Message Log
This is a lesson, not a challenge, the code runs automatically.
But change it! Play with it! Click "Run" to see your changes.
Run
Run and Focus Canvas
Reset
Canvas
(your drawing will display here)
Challenge 5
Challenge 5 Sample Solution
As mentioned in the previous lesson, there are
three required aspects to basic animation:
Drawing frames in rapid sequence.
Clearing the canvas in between frames.
Making small changes to the scene in each frame.
In this lesson we're going to complete the cycle by clearing the canvas
in between frames.
The method
context.clearRect(x, y, width, height)
allows us to clear an area of the canvas. As the lesson above demonstrates,
we want to use it to clear the entire canvas.
So once again, we'll start the flappy square
at (50, 100) and move down 10 pixels every 300 milliseconds.
This time, though,
use context.clearRect()
to clear the canvas in between frames.
Use the method to clear a rectangle starting at
(0, 0)
with a width of
canvas.width
and a height of
canvas.height.
You'll need to call it from within
function programSteps() {
  ...
}
so that it gets called with each frame.
Your animation should look like the example at the beginning of this explanation.
Previous Challenge:
View your
code from
Stage
2
Challenge
4
to use on this challenge.
Code Missing:
You have not yet entered any code in to the previous challenge:
Stage
2
Challenge
4
Stage
2
Challenge
4
Editor
(write code below)
var canvas = document.getElementById('flappy_square_stage2_challenge5');
var context = canvas.getContext('2d');
var interval;
// CODE FROM PREVIOUS CHALLENGE HERE
// JUST FIGURE OUT WHERE TO ADD
// context.clearRect(0, 0, canvas.width, canvas.height)
// The following code is provided for you.
// It creates an eventListener that listens
// for the canvas to come into "focus", which
// happens when you click on it.
// This allows us to stop and start each individual
// animation on this whole page separately.
function startAnimation() {
runProgram();
}
function pauseAnimation() {
clearInterval(interval);
}
canvas.addEventListener('focus', startAnimation);
canvas.addEventListener('blur', pauseAnimation);
canvas.focus();
Message Log
This is a lesson, not a challenge, the code runs automatically.
But change it! Play with it! Click "Run" to see your changes.
Run
Run and Focus Canvas
Reset
Canvas
(your drawing will display here)
A Solution:
Here's the code I wrote to complete this challenge.
View One Possible Solution
var canvas = document.getElementById('flappy_square_stage2_challenge5');
var context = canvas.getContext('2d');
var interval;
var boundary = {
minX: 25,
minY: 25,
width: 425,
height: 275
};
var square = {
x: 25,
y: 75,
size: 20
};
var wall = {
width: 50,
height: 100
};
function drawBoundary() {
context.strokeRect(0, 0, boundary.width, boundary.height);
}
function drawSquare() {
context.fillRect(square.x, square.y, square.size, square.size);
}
function drawWall(x) {
context.fillRect(x, 0, wall.width, wall.height);
context.fillRect(x, boundary.height - wall.height, wall.width, wall.height);
}
function drawWalls() {
drawWall(125);
drawWall(125 * 2);
drawWall(125 * 3);
}
function adjustPosition() {
square.y += 25;
}
function programSteps() {
context.clearRect(0, 0, canvas.width, canvas.height);
adjustPosition();
context.save();
context.translate(boundary.minX, boundary.minY);
drawBoundary();
drawSquare();
drawWalls();
context.restore();
}
function runProgram() {
interval = setInterval(programSteps, 300);
}
// The following code is provided for you.
// It creates an eventListener that listens
// for the canvas to come into "focus", which
// happens when you click on it.
// This allows us to stop and start each individual
// animation on this whole page separately.
function startAnimation() {
runProgram();
}
function pauseAnimation() {
clearInterval(interval);
}
canvas.addEventListener('focus', startAnimation);
canvas.addEventListener('blur', pauseAnimation);
canvas.focus();
Lesson: Gravity
Now we need to make our flappy square fall more realistically.
This essentially requires
simulating gravity.
Gravity causes objects on earth to move toward the center of the Earth
at an accelerating rate, which means that they move faster and faster
toward the ground.
The speed of the object toward the ground is called its "velocity".
Gravity causes the object's velocity to increase over time.
In this examples when you click "Run" a ball will shoot out at
a constant velocity moving right and up while gravity pulls it toward
the ground, causing its upward velocity to decrease until it is negative
(falling).
In this example gravity is set to 0.4. This means that the upward speed (yVelocity)
of our ball will decrease by 0.4 each frame. So in each frame the ball will move up
by 0.4 pixels less than the last frame until it is no longer moving at which point
it will move down by 0.4 pixels more each frame.
This is an arbitrary value that simply makes the simulation look good as we're not
actually trying to simulate gravity accurately.
Also remember that in the canvas the "y" coordinates go up as you move down.
This means that subtracting a negative "yVelocity" from our "y" position actually
makes our "y" value large, drawing the ball farther down on the canvas.
var canvas = document.getElementById('flappy_square_stage2_lesson5');
var context = canvas.getContext('2d');
var gravity = 0.4;
var size = 10;
var interval;
x = 0;
y = canvas.height - 60;
xVelocity = 8;
yVelocity = 12;
function drawBall() {
context.beginPath();
context.arc(x, y, size, 0, Math.PI*2, true);
context.closePath();
context.fill();
}
function adjustPosition() {
yVelocity -= gravity;
x += xVelocity;
y -= yVelocity;
}
function programSteps() {
context.clearRect(0, 0, canvas.width, canvas.height);
adjustPosition();
drawBall();
}
function runProgram() {
interval = setInterval(programSteps, 25);
}
// The following code is provided for you.
// It creates an eventListener that listens
// for the canvas to come into "focus", which
// happens when you click on it.
// This allows us to stop and start each individual
// animation on this whole page separately.
function startAnimation() {
runProgram();
}
function pauseAnimation() {
clearInterval(interval);
context.font = "20px serif";
context.textAlign = 'center';
context.fillText('Click anywhere on the canvas to start animation', canvas.width / 2, 50);
context.fillText('or click "Run" to restart the animations.', canvas.width / 2, 75);
}
canvas.addEventListener('focus', startAnimation);
canvas.addEventListener('blur', pauseAnimation);
pauseAnimation();
Message Log
This is a lesson, not a challenge, the code runs automatically.
But change it! Play with it! Click "Run" to see your changes.
Run
Run and Focus Canvas
Reset
Canvas
(your drawing will display here)
Challenge 6
Challenge 6 Sample Solution
Let's give our flappy square animation a more realistic simulation
of gravity.
Using your code from Challenge
5
instead of just moving the flappy square
down 25 pixels each frame let's track the y velocity of the flappy
square and with each frame let's subtract gravity to increase the velocity
downward.
Our flappy square should start at (50, 100) with a yVelocity of 0. Gravity
should be set to 0.5.
So in each frame you'll subtract gravity from yVelocity and then
you'll subtract yVelocity to the y variable. This will cause the y variable to
increase at an increasing rate (making the flappy square go down
at an increasing rate).
Let's also speed up our animation and instead of running a frame every 300
miliseconds, let's
draw a frame every 25 miliseconds.
Your animation should look like the example to the right.
Important note: In Challenge
5
we added 25 to the "y" variable in each frame causing the square
to move down. Here we need to
subtract "yVelocity"
as "yVelocity" will be negative and subtracting a negative is the same
as adding a positive (I know this can get confusing with the y-coordinate
of the canvas moving in the wrong direction).
Previous Challenge:
View your
code from
Stage
2
Challenge
5
to use on this challenge.
Code Missing:
You have not yet entered any code in to the previous challenge:
Stage
2
Challenge
5
Stage
2
Challenge
5
Editor
(write code below)
var canvas = document.getElementById('flappy_square_stage2_challenge6');
var context = canvas.getContext('2d');
var interval;
var gravity = ;
// HASH VARIABLES HERE
// Remember to store yVelocity in
// your square hash variable
function drawBoundary() {
}
function drawSquare() {
}
function drawWall(x) {
}
function drawWalls() {
}
function adjustPosition() {
// Instead of simply adding
// 25 to the "square.y" variable you'll
// need to both adjust the "square.yVelocity"
// and then use it to adjust "square.y"
}
function programSteps() {
}
function runProgram() {
interval =
}
// The following code is provided for you.
// It creates an eventListener that listens
// for the canvas to come into "focus", which
// happens when you click on it.
// This allows us to stop and start each individual
// animation on this whole page separately.
function startAnimation() {
runProgram();
}
function pauseAnimation() {
clearInterval(interval);
}
canvas.addEventListener('focus', startAnimation);
canvas.addEventListener('blur', pauseAnimation);
canvas.focus();
Message Log
This is a lesson, not a challenge, the code runs automatically.
But change it! Play with it! Click "Run" to see your changes.
Run
Run and Focus Canvas
Reset
Canvas
(your drawing will display here)
A Solution:
Here's the code I wrote to complete this challenge.
View One Possible Solution
var canvas = document.getElementById('flappy_square_stage2_challenge6');
var context = canvas.getContext('2d');
var interval;
var gravity = 0.5;
var boundary = {
minX: 25,
minY: 25,
width: 425,
height: 275
};
var square = {
x: 25,
y: 75,
size: 20,
yVelocity: 0
};
var wall = {
width: 50,
height: 100
};
function drawBoundary() {
context.strokeRect(0, 0, boundary.width, boundary.height);
}
function drawSquare() {
context.fillRect(square.x, square.y, square.size, square.size);
}
function drawWall(x) {
context.fillRect(x, 0, wall.width, wall.height);
context.fillRect(x, boundary.height - wall.height, wall.width, wall.height);
}
function drawWalls() {
drawWall(125);
drawWall(125 * 2);
drawWall(125 * 3);
}
function adjustPosition() {
square.yVelocity += gravity;
square.y += square.yVelocity;
}
function programSteps() {
context.clearRect(0, 0, canvas.width, canvas.height);
adjustPosition();
context.save();
context.translate(boundary.minX, boundary.minY);
drawBoundary();
drawSquare();
drawWalls();
context.restore();
}
function runProgram() {
interval = setInterval(programSteps, 25);
}
// The following code is provided for you.
// It creates an eventListener that listens
// for the canvas to come into "focus", which
// happens when you click on it.
// This allows us to stop and start each individual
// animation on this whole page separately.
function startAnimation() {
runProgram();
}
function pauseAnimation() {
clearInterval(interval);
}
canvas.addEventListener('focus', startAnimation);
canvas.addEventListener('blur', pauseAnimation);
canvas.focus();